Sunday, November 2, 2014

Build a custom Launcher - sourceCode

This tutorial helps you to create your own launcher. note that its a basic launcher, which gives you an idea of launcher. first, create an android project using eclipse or android studio.

1.lets start with AndroidManifest.xml - open this file. we have to do some changes here.


by adding below given categories to intent filter, our activity acts like a launcher
   <category android:name="android.intent.category.HOME" />
    <category android:name="android.intent.category.DEFAULT" />

to allow users to see their wallpaper we use 'android:theme="@android:style/Theme.Wallpaper.NoTitleBar.Fullscreen"'

this is the only changes that we add to our default AndroidManifest.xml file. save it and close. :)


2.activity_main,xml
our main layout contain only one button. when user do click on this button, apps list will be shown.


3.MainActivity.java

we have created a button in above xml file. in our MainActivity we initialize this button and assign a fuction that should be performed on a click event. when we click on button, actvity will create an Intent and start new activity- AppList, which will load all apps in android device.


4.Create new activity AppList. this activity contain only a gridView, which is used to display app icon and app name. we add a listener to grid view, onItemClickListener., on click, the app will open.

Layout of AppList


each grid contain one imageview and a  textview. so we create alayout for grid item as shown below
filename: grid_item.xml


below given AppList.java


i will explain fuction in AppList.

function getApps()- it is used to fetch details of apps intalled on a device. we store these information in an arraylist. we have created a class 'App' to hold properties of Applications.

fuction showApps()-this is used to populate gridview.

finally we add an onItemclickListener to gridview. so whenever we click on an item, the app show in that grid will open.


Monday, November 18, 2013

Customise ListView android

1.Create a simple xml layout for the listView item
for example : 
file name : /res/layout/my_dlg.xml

<?xml version="1.0" encoding="utf-8"?>
<LinearLayout xmlns:android="http://schemas.android.com/apk/res/android"
    android:layout_width="match_parent"
    android:layout_height="match_parent"
    android:gravity="center"
    android:orientation="horizontal" >

    <ImageView
        android:id="@+id/imageView1"
        android:layout_width="wrap_content"
        android:layout_height="wrap_content"
        android:src="@drawable/ic_launcher" />

    <TextView
        android:id="@+id/textView1"
        android:layout_width="wrap_content"
        android:layout_height="wrap_content"
        android:text="Large Text"
        android:textAppearance="?android:attr/textAppearanceLarge" />

</LinearLayout>


2.now we need a custome ArrayAdapter for the listview. so create a class which extends ArrayAdapter

for example : 

file name : src/com/example/customlist/MyAdapter.java

public class MyAdapter extends ArrayAdapter<MyData> {
Context context;
    int layoutResourceId;  
    Drawable bm=null;
    MyHolder holder = null;
    ArrayList<MyData> data = null;
public MyAdapter(Context context, int resource, ArrayList<MyData> data) {
super(context, resource,data);
this.layoutResourceId = resource;
     this.context = context;
     this.data = data;

}

   static class MyHolder
   { //this class hold the ui elements in each list item
    //we have one image view and textview in our layout
       ImageView imageView;
       TextView textView;
   }
   //we need to override the following method in arrayadapter
   @Override
   public View getView(int position, View convertView, ViewGroup parent) {
       View row = convertView;
       //row is our listitem view
       if(row == null)
       {
           LayoutInflater inflater = ((Activity)context).getLayoutInflater();
         
           //assign custome layout to the view row,that is our listitem view
           row = inflater.inflate(layoutResourceId, parent, false);
           //create a new holder for list item
           holder = new MyHolder();
           //initialize ui elements in the layout
           holder.textView= (TextView)row.findViewById(R.id.textView1);
           holder.imageView=(ImageView)row.findViewById(R.id.imageView1);
           row.setTag(holder);
       }
       else
       {
           holder = (MyHolder)row.getTag();
       }
       //create MyData object for the current list item.
       final MyData rest = data.get(position);
       //set image of imageview
       holder.imageView.setImageResource(rest.imageId);
       //set text of textview
       holder.textView.setText(rest.string);
       return row;
   }
}
//this class hold the data to be linked with each list item
class MyData{
int imageId;
String string;

public MyData(int imageId,String string){
this.imageId=imageId;
this.string=string;
}

}


step 3.
create main layout

example :

file name : /res/layout/activity_main.xml

<RelativeLayout xmlns:android="http://schemas.android.com/apk/res/android"
    xmlns:tools="http://schemas.android.com/tools"
    android:layout_width="match_parent"
    android:layout_height="match_parent"
    tools:context=".MainActivity" >

    <ListView
        android:id="@+id/listView1"
        android:layout_width="match_parent"
        android:layout_height="wrap_content"
        android:layout_alignParentLeft="true"
        android:layout_alignParentTop="true" >
    </ListView>

</RelativeLayout>


step 4

now we want to initialize our listview and set data of each lis item in the listview
for doing this, open your activity class, (may be MainActivity.java) and do the following

example :

file name : /src/com/example/customlist/MainActivity.java

public class MainActivity extends Activity {

@Override
protected void onCreate(Bundle savedInstanceState) {
super.onCreate(savedInstanceState);
setContentView(R.layout.activity_main);
//create listview
ListView listView=(ListView)findViewById(R.id.listView1);
//create arraya list to store list item data , each list item contain MyData
ArrayList<MyData> data=new ArrayList<MyData>();
//create adapter for listview
MyAdapter adapter=new MyAdapter(this, R.layout.my_dlg, data);
//set listview adapter
listView.setAdapter(adapter);

//add data to array list, which should be displayed on list view

for(int i=0;i<5;i++){

                        //you can add diffent images in each list. just create an array of image resource id
                        //and use it here ,like imagId[i]; ..
data.add(new MyData(R.drawable.ic_launcher,"this is item "+i+1));
}

//notify the listview that, the content of arra is changed
adapter.notifyDataSetChanged();

//thats all


}

@Override
public boolean onCreateOptionsMenu(Menu menu) {
// Inflate the menu; this adds items to the action bar if it is present.
getMenuInflater().inflate(R.menu.activity_main, menu);
return true;
}

}

step 5

thats all...sorry for my bad english

Sunday, November 17, 2013

customize dialog box in android

STEP 1
create xml layout for the Dialog
example :
file name and path  : /res/layout/my_dlg.xml

<?xml version="1.0" encoding="utf-8"?>
<LinearLayout xmlns:android="http://schemas.android.com/apk/res/android"
    android:layout_width="match_parent"
    android:layout_height="match_parent"
    android:orientation="vertical" >

    <EditText
        android:id="@+id/editText1"
        android:layout_width="match_parent"
        android:layout_height="wrap_content"
        android:ems="10" >

        <requestFocus />
    </EditText>

    <Button
        android:id="@+id/button1"
        android:layout_width="fill_parent"
        android:layout_height="wrap_content"
        android:text="Button" />

    <TextView
        android:id="@+id/textView1"
        android:layout_width="wrap_content"
        android:layout_height="wrap_content"
        android:layout_gravity="center"
        android:text="Large Text"
        android:textAppearance="?android:attr/textAppearanceLarge" />

</LinearLayout>


STEP 2

Create Dialog box

code given below
public void showDlg(){
//create dialog object and initialize
Dialog dialog=new Dialog(this,android.R.style.Theme_DeviceDefault_Dialog);
//set title of dialog
dialog.setTitle("My Tiltle");
//set Layout of the dialog
dialog.setContentView(R.layout.my_dlg);

//Intialize UI elements inside the layout
final EditText editText=(EditText)dialog.findViewById(R.id.editText1);
Button button=(Button)dialog.findViewById(R.id.button1);
final TextView textView=(TextView)dialog.findViewById(R.id.textView1);

//some actions

button.setOnClickListener(new OnClickListener() {

@Override
public void onClick(View arg0) {
// TODO Auto-generated method stub
String hi="editText="+editText.getText().toString();

textView.setText(hi);

}
});

//finally show the dialog

dialog.show();
}


STEP 3
thats all...

Saturday, January 5, 2013

A simple form : Button-EditText-TextView

Requirements- Android Development Tool (ADT-Eclipse~400mb) Download
(friends actually i dont know english... :( )
let's start..
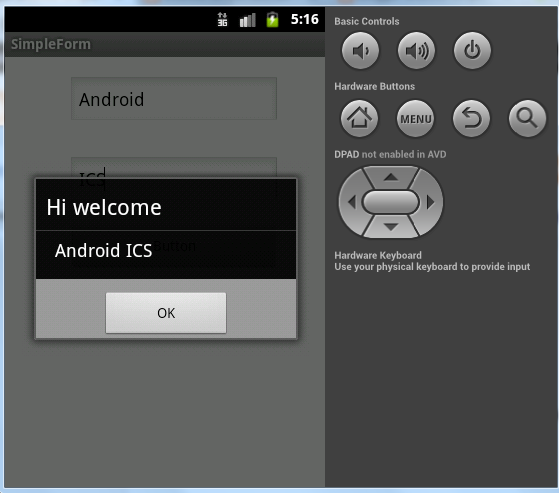
We are going to create a simple form which contains text fields and a button. When we click the button a popup message showed . Steps are shown below

1.Create Project in Eclipse


then, press 'next'-'next'-'next'-'next'-'finish'
you can see app's details on the left side. Image shown below
Project setup completed...

2.Create Layout
in this step we create the Graphical user interface, ie GUI
after you pressed the finish button, you can see something like this in your screen


"activity_main.xml" contains the code for GUI. GUI is defined in xml
this IDE provides drag&drop UI development. so there is no need to type the code. just select what you want, then drag it to the screen. simple.. our gui need two textfields (EditText) and a Button. a 'Hello World' is showed in the middle of the screen. click that and then press delete. Then just expand the 'TextFields' folder and select a textfield. Button is inside the 'form widgets'


 just click activity_mai.xml which is located below Palette. the xml file is shown below


We use id's to link between .java file and .xml file
here editText1,editText2,button1 are the id's of TextFileds and button. In android these elements are included in a class known as View.
3.The real coding starts from here. you have to open a file MainActivity.java ("src-com.example.simpleform-MainActivity.java" ie, expand src, then the package the open the file)

screenshot of file is shown below

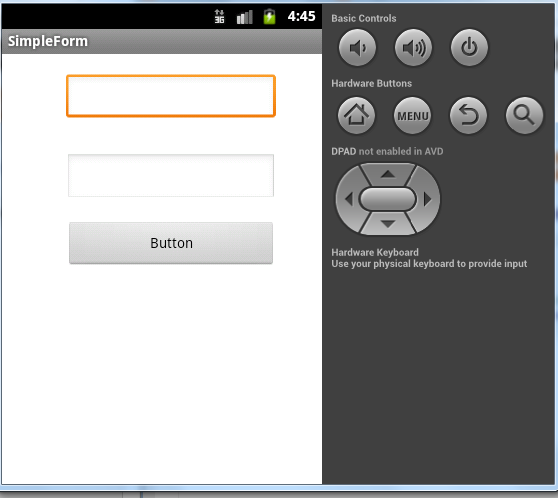
now, just run your project. ctrl+f11 or Run->run or press the green play button.
(click here to see how to setup an AVD )


now click the button, but nothing happens ;)
in the next step, we add some actions to be performed when we click the Button.

4.Coding

create objects of EditText and Button. this objects will have a link to xml file.

       final EditText fname=(EditText) findViewById(R.id.editText1);
       final EditText lname=(EditText) findViewById(R.id.editText2);
       final Button button=(Button) findViewById(R.id.button1);

addan OnClickActionListener to the button. ie when the button is clicked, actions defined inside the interface is performed.
           button.setOnClickListener(new OnClickListener() {

@Override
public void onClick(View arg0) {
// TODO Auto-generated method stub.actions are defined here

}
});


here we want to access the texts in the two textfiels. that is get the data from textfield and then store the values in a String. the code is shown below

                                String s1=fname.getText().toString();
String s2=lname.getText().toString();
String msg=s1+s2;
next, we need to show the message. we use 'AlertDialog' class for this.


              AlertDialog alertDialog = new AlertDialog.Builder(MainActivity.this).create();
      alertDialog.setTitle("Details");                                                                                                          
      alertDialog.setMessage(msg);

alertDialog.setButton("OK", new DialogInterface.OnClickListener() {
               public void onClick(DialogInterface dialog, int which) {
               // Write your code here to execute after dialog closed
               Toast.makeText(getApplicationContext(), "your texts", Toast.LENGTH_SHORT).show();
               }
       });

Entire code:-


package com.example.simpleform;
import android.app.Activity;
import android.app.AlertDialog;
import android.content.DialogInterface;
import android.os.Bundle;
import android.view.Menu;
import android.view.View;
import android.view.View.OnClickListener;
import android.widget.Button;
import android.widget.EditText;
import android.widget.Toast;

public class MainActivity extends Activity {

    @Override
    protected void onCreate(Bundle savedInstanceState) {
        super.onCreate(savedInstanceState);
        setContentView(R.layout.activity_main);

        final EditText fname=(EditText) findViewById(R.id.editText1);
        final EditText lname=(EditText) findViewById(R.id.editText2);
        Button button=(Button) findViewById(R.id.button1);
     
        button.setOnClickListener(new OnClickListener() {

@SuppressWarnings("deprecation")
@Override
public void onClick(View arg0) {
// TODO Auto-generated method stub

String f=fname.getText().toString();
String l=lname.getText().toString();
String msg=f+" "+l;

AlertDialog alertDialog = new AlertDialog.Builder(MainActivity.this).create();
alertDialog.setTitle("Hi welcome");
alertDialog.setMessage(msg);

alertDialog.setButton("OK", new DialogInterface.OnClickListener() {
               public void onClick(DialogInterface dialog, int which) {
               // Write your code here to execute after dialog closed
               Toast.makeText(getApplicationContext(), "your text", Toast.LENGTH_SHORT).show();
               }
       });
alertDialog.show();

}
});
     
     
    }

    @Override
    public boolean onCreateOptionsMenu(Menu menu) {
        // Inflate the menu; this adds items to the action bar if it is present.
        getMenuInflater().inflate(R.menu.activity_main, menu);
        return true;
    }
 
}


NOW RUN YOUR PROJECT...:)


:)